For this video, I’m going to show you how to take a few simple ingredients, and make mountains and mountains of your own custom gummy candies, at home. Start with a box of Jell-O, some corn syrup, and a few packets of unflavored gelatin. The small boxes like this have 4 packets inside, and for this recipe, you’ll actually only need 2 of them. Get started by measuring out 1/2 cup of very cold water, then squirt in 1/4 cup of corn syrup. Cold water will help the gelatin separate properly, and the corn syrup is going to give our gummies a nice smooth texture. Now we need the corn syrup fully dissolved, so give it a good stirring until the water turns completely clear. Then go ahead and pour the sugary liquid into a pot. But don’t turn on the stove just yet. I’ll show you what happens if you do in just a minute.
Go ahead and add both packets of unflavored gelatin to the pot, then pour in the entire packet of Jell-O. Now it’s going to take a minute or two for the gelatin to absorb into the water, but take your time and be patient so you don’t make a mess. And keep stirring it slowly, until you can see all the gelatin is mixed in. Alright, it’s time to heat things up, and turn this sugary soup, into a delicious candy syrup. Set your stove to medium-low heat, for around 5-10 minutes, making sure to stir the candy mix every minute or two, to keep it from burning.
While that’s warming, it’s a good idea to find something you can use as a candy mold, like these ice cube trays, I found at the LEGO store. When you see the gelatin has completely liquified, the syrup is ready for pouring. And you should be able to pour it straight into the molds. But be careful not to spill, because the syrup’s extremely hot, and will burn you. Now if you see little lumps, clumps or bubbles floating to the top, it’s probably because you didn’t start with cold water, or you heated up the mixture too fast for the gelatin to fully separate. But don’t worry. There’s a really easy way to fix it.
Pour all of the syrup into a tall and narrow, heat-resistant container, like a large drinking glass. As you do, you’ll immediately notice all the bubbles and gelatin lumps, start rising to the top. Let it sit for around 10 minutes to give it all a good chance to settle and cool a bit, and you’ll soon see all the impurities collect together at the top, and separate into a layer of gummy foam. Now check this out. All you have to do is reach in with a spoon or a spatula and scrape this newly formed skin away. Just like that, you’ve got yourself a beautiful, and impressively clean gummy syrup, ready for casting. And to make the next steps as easy as possible, I’m collecting the magical syrup, in a condiment container. These kinds of containers are perfect for filling up your molds. They’re super easy to control, and you can squirt the syrup exactly where you need it, which helps avoid spilling, or overflowing the molds with too much gummy. I gave these candies a few hours to cool, so you can see just how much of a difference it makes, to take the extra step and skim the bubbles off the top, before making your candies.
Alright, let’s see how our gummy mix does with a much more intricate, and detailed ice cube mold, like this one. And you might have noticed that this time, the syrup, is impressively clear. 5 hours later, we’ve got ourselves a batch of really cool, LEGO gummy guys. Which apparently, are balanced enough, that they can stand up on their own. That’s kind of cool. Now just for fun, I made a silicone mold from actual LEGO bricks, and a 2 part silicone mix from a special effects supply store.. Now you should know that when the syrup cools down, it’s going to shrink a little. So to compensate for that, try filling the molds just a tiny bit higher than the top.
For one finishing touch, I got a clean LEGO baseplate, and brushed it lightly with vegetable oil, then carefully placed it down on top of the mold. You can see the edges have little dimples, to help keep all the studs perfectly aligned. So all it needs now is something like a heavy book to give it some weight, and hold it in place. I let these ones cool on the counter for around 6 hours, and you can see that if we carefully remove the baseplate now, our little LEGO gummies, have small divots on the bottom, which means they’re connectable. Let’s take one of the bricks out out of the mold, and take a good look up close. You can see there’s a surprising amount of detail captured in the gummy snack, and they’re not sticky at all, but actually quite firm, and they smell delicious. You probably also noticed they’re completely transparent, which puts their level of awesomeness on a completely different scale.
Alright let’s take this idea to the next level with different colors and different flavors. I tripled the recipes and made 7 different batches. Then let them cool overnight so they’d all be crystal clear. Now if you try doing this yourself, you might find that getting them out of the cups is pretty tricky. When you do get them out though, you’ll have a gob of gummy, that way too big to eat on it’s own. But that’s ok because what we’re really after here is the white layer of gummy foam at the top. Now if you’re really careful, you can use something like a kitchen knife to slowly trim the top layer off, which will leave you with a huge chunk of gummy goodness. And these transparent gummy blocks can be re-melted on medium-low heat, and molded into any shape you want.
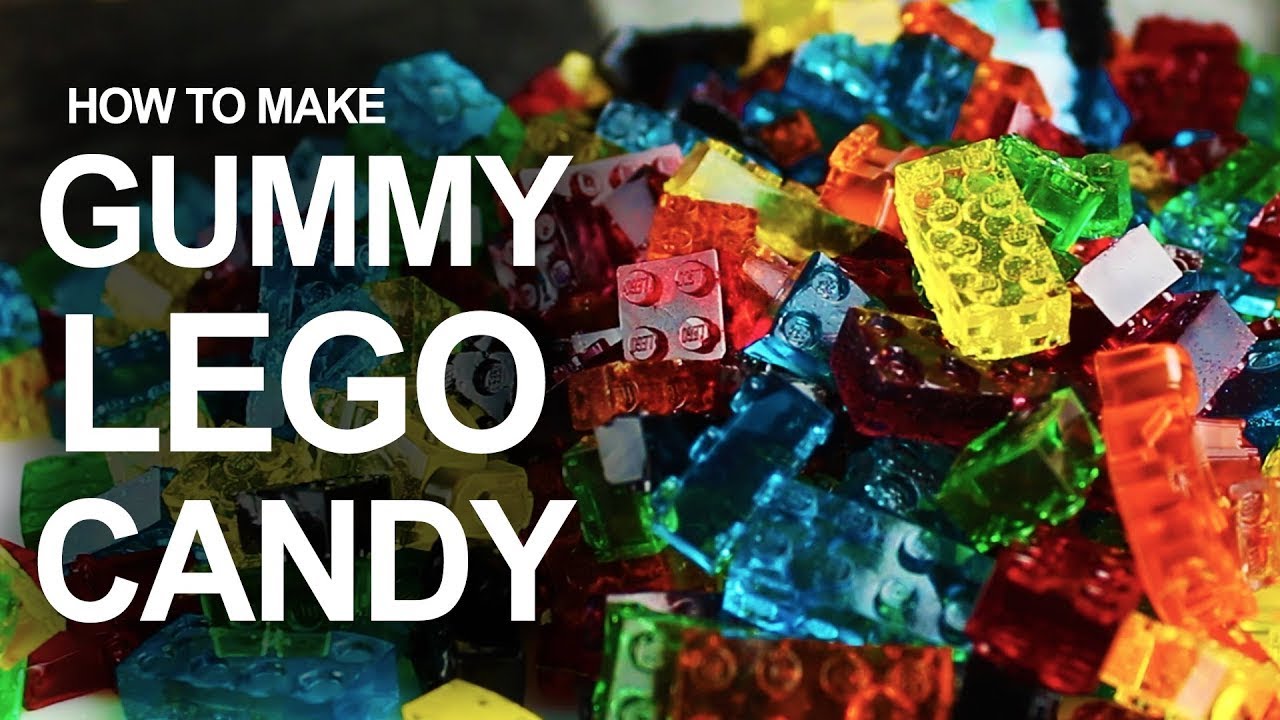
I made a candy mountain, of LEGO gummy bricks, in all kinds of colors, shapes and sizes. And if you look closely, you can even see some little gummy guys in there as well. In keeping with the LEGO theme, I went back to the store and picked up a bunch of containers, just so I could have a unique place, to store my custom candies. Now you could keep all your LEGO gummies separate, but I ended up mixing all mine together and filling the containers with all kinds of random pieces. How awesome is that? The best part is, if you snap on the lid and keep them in the fridge, they can stay good for up to a month.
Now since the gummies are interlocking, you might be wondering if you can build things with them as well. The answer is yes, as long as you can resist the temptation to snack on them first. For one last experiment, try finding a handful of chewable vitamin C tablets, and powderize them in a blender for about 30 seconds. I used 8 tablets, or 4,000 mg for this batch, and when you mix the powder into the gummy syrup, you’ve just made your candies, vitamin C enriched. Of course these are a slightly healthier version, but more importantly, it gives them a slightly sour taste, making them even more delicious, and extremely addictive. Well now you know how to use a few simple ingredients to make a bucketful, of colorful LEGO gummies. That are stackable, snack-able, and fun to share. By the way, you don’t have to make your gummies into LEGOs. You can actually make any thing you can think of. I converted some of my left over syrup, into an assortment of AA, AAA, and D cell batteries.
Well that’s it for now. If you like this project, perhaps you’ll like some of my others. Check them out at www.thekingofrandom.com
Source: The King of Random
Comments
Post a Comment